TOYOTA HIACE STARTER REMOVAL
Safety Precautions
- Ensure the vehicle is on a stable, level surface.
- Disconnect the negative battery terminal before beginning work.
- Wear safety gloves and eye protection.
Step 1: Remove Rear Carpet Trim
1. Disconnect the negative terminal of the battery.
2. Remove the four forward-most screws from the trim securing the rear carpet.

Figure 1: Trim screw locations.
Step 2: Expose Carpet and Insulation
3. Pull back the side trim and lift the front edge of the carpet from its connector.
4. Remove the carpet brackets from the floor.
5. Fold back the upper carpet to reveal insulation and the floor panel.

Figure 2: Carpet pulled back showing insulation and floor panel.
Step 3: Disconnect Carpet at Driver’s Seat
6. Locate the connector behind the driver’s seat.
7. Unhook the carpet and roll it completely back and out of the way

Figure 3: Carpet pulled back beside driver’s seat showing underlayment and trim.
Step 4: Remove Fasteners
8. Remove six 12 mm bolts (indicated in blue) and one 14 mm bolt (indicated in red).
9. Remove the thirteen 10 mm bolts securing the access panel.
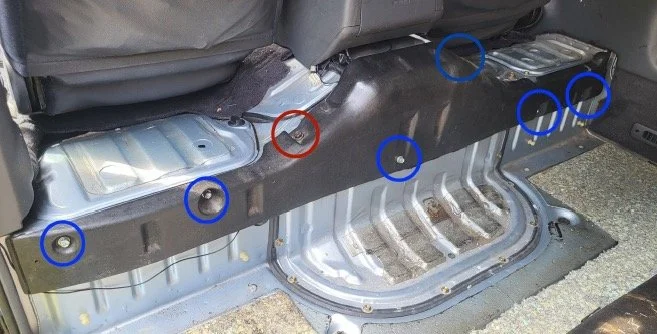
Figure 4: Access panel perimeter (circled).

Figure 5: Six 12 mm (blue) and one 14 mm (red) fasteners.
Step 5: Detach the Starter
10. Locate the two main fasteners securing the starter to the engine/transmission: one bolts into the engine block; the other is secured with a nut on the backside.
11. Disconnect the two electrical connectors from the starter.

Figure 6: Starter-to-transmission fasteners (arrows).

Figure 7: Electrical connections — battery cable boot (red) and signal connector (blue).
Step 6: Remove Bracket and Starter
12. Support the starter from below—it will be free once the bracket is removed.
13. Remove the upper nut on the support bracket (red).
14. Remove the two bolts securing the bracket to the engine block.
15. Carefully slide the starter forward, then angle it out through the bottom of the vehicle.

Figure 8: Lower support bracket — upper nut (red) and bracket bolts (blue).